Blog
Asynchronous Javascript
- Promise
- The
Promiseobject represents the eventual completion (or failure) of an asynchronous operation and its resulting value. APromiseis a proxy for a value not necessarily known when the promise is created. It allows you to associate handlers with an asynchronous action’s eventual success value or failure reason. This lets asynchronous methods return values like synchronous methods: instead of immediately returning the final value, the asynchronous method returns a /promise/ to supply the value at some point in the future.
asyncio python
- History
- greenlet
- yield
- python3.4 asyncio
yield from asyncio.sleep(1)yieldallow switch to other coroutines if blocked on IO
-
python3.5 (async, await), 3.7(run)
- await, async
Docker storage
- Python+Deep+Dive+2.pdf
-
List Comprehension
- nested
- Generator - something that[(i, j) for i in range(1, 6) if i%2==0 for j in range(1, 6) if j%3==0] [[i*j for j in range(5)] for i in range 5]yieldis a generator - List comprehension build with[], generator expression build with()-(i**2 for i in range(5))- Lazy evaluation and local scope . get value ofi**2untilnext-yieldandyield from(python 3.3) -yieldis used to produce a value from the generator and to suspend the function’s state so that it can be resumed right from where it left off. - It essentially allows the function to return a value (like a regular function would withreturn) but remembers its state for future calls.``` python def simple_generator(): yield 1 yield 2 yield 3 gen = simple_generator() print(next(gen)) # Output: 1 print(next(gen)) # Output: 2 print(next(gen)) # Output: 3 ``` - `yield from` is used to delegate part of its operations to another generator. This simplifies the code when a generator function is calling another generator function. It's a way to yield all values from another iterable (often another generator) without using a loop. - Example: ``` python def generator_without_yield_from(): for item in simple_generator(): yield item gen = generator_without_yield_from() print(next(gen)) # Output: 1 print(next(gen)) # Output: 2 print(next(gen)) # Output: 3 # with yield from def generator_with_yield_from(): yield from simple_generator() gen = generator_with_yield_from() print(next(gen)) # Output: 1 print(next(gen)) # Output: 2 print(next(gen)) # Output: 3 ``` - User case - `yield`: When you're producing values in a generator function. - `yield from`: When you want to delegate yielding values to another generator (or any iterable) within a generator function. - also `yield from` is useful when `with open(filename) as f:` context and you should `yield from` instead of `yield` or `return` the lazy iterator inside context- Set
- operations
|: union,set1|set2|set3&: joinset1 & set2 & set3-: differenceset1 - set2^: semmetric difference, same as(s1 | s2) -( s1 & s2 )<and<=containment,>and>=
- mutate a set
-
|=,&=,-=,^= -
frozenset is a const set
Python Django deployment
- Normally there are following way to deploy python service
- ECS/EKS
- EC2
- EBS (elastic beanstalk)
- Lambda
- WSGI
- WSGI is the Web Server Gateway Interface. It is a specification that describes how a web server communicates with web applications
- why we need a gateway mediator
- flexiblity
- If you directly point your web server to your application, it reduces the flexibility** **of your application. Since your web server now directly points to your web application, you are unable to swap out web stack components.
:drawer:
              let’s say you’ve decided to deploy your application using Gunicorn, but several years later, you decide to switch from Gunicorn to mod_wsgi. In this situation, you could easily switch to mod_wsgi without making any changes in the application or framework because you used WSGI. WSGI provides flexibility to your application.

:END:
- If you directly point your web server to your application, it reduces the flexibility** **of your application. Since your web server now directly points to your web application, you are unable to swap out web stack components.
- scalability
- WSGI is capable of serving thousands of requests at a time. The WSGI server is responsible for handling the requests from the web server and making decisions for carrying out the communication of those requests to an application framework’s process. we can divide the responsibilities among the servers for scaling web traffic.
- flexiblity
- How to use Django with Gunicorn
- How to use Django with uWSGI
- How to use Django with Apache and mod
- How to authenticate against Django’s user database from Apache
- ASGI
- ASGI (Asynchronous Server Gateway Interface)
- How to use Django with Daphne
- How to use Django with Hypercorn
-
How to use Django with Uvicorn
Python Django Restful Framework
- Django Restful Framework Videos url:: drf实战和源码剖析 channel:: https://space.bilibili.com/336469068 tags:: rest, DRF, python, django, web, API date:: [[Sep 25th, 2023]] tutor:: 武沛齐
- Resources heading:: 2
-
Jump start heading:: 2
- install heading:: 3
-
usage heading:: 3
- Quickstart - Django REST framework
- settings:
- minium django setup heading:: 3# views.py from rest_framework.response import Response from rest_framework.decorators import api_view @api_view(['GET']) def login(reqeust): return Response({'status': 'sucessfull', 'message'}) from rest_framework.views import APIView class LoginView(APIView): def get(self, request): return Response({'status': 'sucessfull', 'message'}) # urls.py urlpatterns = { path('login/', views.LoginView.as_view()) path('login2/', views.login()) }
- ((651210f8-a2fe-4194-9216-f1eefdded8a6)) heading:: 2 - APIView heading:: 2 desc:: REST framework provides an APIView class, which subclasses Django’s View class. - APIView <- django.views.View and it implementedINSTALLED_APPS = [ 'django.contrib.staticfiles', 'api.apps.ApiConfig', # this include app : api 'rest_framework' ] MIDDLEWARE = [ 'django.middleware.security.SecurityMiddleware', 'django.middleware.common.CommonMiddleware', 'django.middleware.clickjacking.XFrameOptionsMiddleware', ] TEMPLATES = [ { 'BACKEND': 'django.template.backends.django.DjangoTemplates', 'DIRS': [], 'APP_DIRS': True, 'OPTIONS': { 'context_processors': [ 'django.template.context_processors.debug', 'django.template.context_processors.request', ], }, }, ] REST_FRAMEWORK = { "UNAUTHENTICATED_USER": None # disable user-content reference }as_view()- APIView hascsrf_exempt. It implementedas_viewanddispatch- Requests passed to the handler methods will be REST framework’sRequestinstances, not Django’sHttpRequestinstances. - Handler methods may return REST framework’sResponse, instead of Django’sHttpResponseThe view will manage content negotiation and setting the correct renderer on the response. - AnyAPIExceptionexceptions will be caught and mediated into appropriate responses. - Incoming requests will be authenticated and appropriate permission and/or throttle checks will be run before dispatching the request to the handler method. - - Requests heading:: 2 desc:: REST framework’s Request class extends the standard HttpRequest, adding support for REST framework’s flexible request parsing and request authentication. - Requests - Django REST framework heading:: 3 - DRF extend django HttpRequests by adding heading:: 3 -data: userequest.data.get('fieldname')to get data from a POST request -query_paramshandle URL like/users/?id=12- Authentication - Browser enhancement - extends HttpRequest - META - session - version - request.version - request.versioning_{ schema} - parser - negotiator - - Authentication heading:: 2 desc:: Auhentication is the mechanism of associating an incoming request with a set of identifying credentials, such as the user the request came from, or the token that it was signed with. The permission and throttling policies can then use those credentials to determine if the request should be permitted. id:: 65136fb1-b3fd-40b2-b22b-d8ea5e0908b9 - Create a new Authentiation class heading:: 3 - SimpleAuth heading:: 3- Apply Authentication Globally heading:: 3 - in Settings.py# auth.py class SimpleAuth(BaseAuthentication): def authenticate(self, request): token = request.query_params.get('token') if token: return 'admin', token #return user and token raise AuthenticationFailed('token missing') def authenticate_header(self, request): return "xxx app" # return when you need something put in header when failed # view.py class UserView(APIView): authentication_class = [SimpleAuth] # Auth is required def get(self, request): print(request.user, request.auth) # prints 'admin', token return Response({})``` python REST_FRAMEWORK= { "DEFAULT_AUTHENTICATION_CLASS": ["api.view.SimpleAuth",] # use string to avoid imporiting packages } ``` - Override - First get Auth from setting.py and in each view read `authentication_class`. The 2nd will override global setting if it is not `None` set 2^{ nd} to `[]` will disable global setting and disable Auth-
Multi Authenticators heading:: 4
- If
authenticate()returnsNonewhen failed, DRF will go to next Authenticator until the return value is not None. - If all returns None. then
self.auth == None - If you want to prevent
Nonego through, put an authenticator that will raise fail at end of list - Verify token in Authentication middleware
- Auth success whenclass QueryTokenAuth(BaseAuthentication): def authenticate(self, request): token = request.query_params.get('token') # api: GET order/?orderid=12&token=3322-333-111-111-3233 if not token return user = models.UserInfo.objects.filter(token=token).first() if user: return user, token # request.user = user, request.token=token raise AuthenticationFailed({'code': 401}) def authenticate_header(self, request): return "query failure" class HeaderTokenAuth(BaseAuthentication): def authenticate(self, request): token = request.META.get("HTTP_AUTHORIZATION") # api: GET order/?orderid=12&token=3322-333-111-111-3233 if not token return user = models.UserInfo.objects.filter(token=token).first() if user: return user, token # request.user = user, request.token=token raise AuthenticationFailed({'code': 401}) def authenticate_header(self, request): return "nead failure"any()of authenticator returnuser, auth- Login, Register and token issuing heading:: 3 - Login and Register User — Django Rest Framework | by Emre Cevik | Python | Django & Rest | Medium - Login url- Simple login with user/passwordurlpatterns = [ path('login/', MyObtainTokenPairView.as_view(), name='token_obtain_pair'), path('login/refresh/', TokenRefreshView.as_view(), name='token_refresh'), ]- Permission heading:: 2 desc:: Together with authentication and throttling, permissions determine whether a request should be granted or denied access. url:: DRF: Permission - Permissions are used to grant or deny access for different classes of users to different parts of the API. - The simplest style of permission would be to allow access to any authenticated user, and deny access to any unauthenticated user. This corresponds to theclass LoginView(APIView): authentication_classes=[] def post(self, request): user = request.data.get('username') pwd = request.data.get('password') user = models.UserInfo.objects.filter(username=user, password=pwd).first() if not user: return Response({'status': 1002, 'message': "user/pass failed"}) token=str(uuid.uuid4()) user.token = token user.save() return Response({"status": 200, 'data'= token})IsAuthenticatedclass in REST framework. - Sample permission class - If
- Per-View permission check with -from rest_framework import permissions class IsOwnerOrReadOnly(permissions.BasePermission): """ Custom permission to only allow owners of an object to edit it. """ # message is used to create a response body when per check failed code = 401 # used to set http code message = {"status":"False", "code": code, "data": "permission error for user", "msg": "IsOwnerCheck"} def has_permission(self, request, view): # Read permissions are allowed to any request, # so we'll always allow GET, HEAD or OPTIONS requests. if request.method in permissions.SAFE_METHODS: return True # Write permissions are only allowed to the owner of the snippet. return False def has_object_permission(self, request, view, obj): # Read permissions are allowed to any request, # so we'll always allow GET, HEAD or OPTIONS requests. if request.method in permissions.SAFE_METHODS: return True # Write permissions are only allowed to the owner of the snippet. return obj.owner == request.userpermission_classesisall(), it is not same asauthentication_classes- Global setting with - One difference between ((65136fb1-b3fd-40b2-b22b-d8ea5e0908b9)) is if a list of Per-Class is add. ALL Permission check need success/True. It is AND operation - Add permission check in view - Check permissions override - if you need to override default permission check mechanism, overridecheck_permissions()function in view class 💀 - Throttling heading:: 2 desc:: Throttling is similar to permissions, in that it determines if a request should be authorized. Throttles indicate a temporary state, and are used to control the rate of requests that clients can make to an API. - As with permissions, multiple throttles may be used. Your API might have a restrictive throttle for unauthenticated requests, and a less restrictive throttle for authenticated requests. - Another scenario where you might want to use multiple throttles would be if you need to impose different constraints on different parts of the API, due to some services being particularly resource-intensive. - SettingsAnd in View FBVREST_FRAMEWORK = { 'DEFAULT_THROTTLE_CLASSES': [ 'rest_framework.throttling.AnonRateThrottle', 'rest_framework.throttling.UserRateThrottle' ], 'DEFAULT_THROTTLE_RATES': { 'anon': '100/day', 'user': '1000/day' } }- Define a throttle Class - In most case throttle class in django is good enough for 99% of the user cases. But in case you need to define a throttle of your own, here is two examples:@api_view(['GET']) @throttle_classes([UserRateThrottle]) def example_view(request, format=None): content = { 'status': 'request was permitted' } return Response(content)- Versioning heading:: 2 desc:: Versioning allows you to alter behavior between different clients. DRF provides for a number of different versioning schemes. - Config API version heading:: 3 - [[../assets/image-20210819154455680_1696666609261_0.png]] - settings.pyclass RandomRateThrottle(throttling.BaseThrottle): def allow_request(self, request, view): return random.randint(1, 10) != 1 class RandomRateThrottle2(throttling.SimpleRateThrottle): def allow_request(self, request, view): if super().allow_request(request, view): return random.randint(1, 10) != 1 class MyRateThrottle(SimpleRateThrottle): cache = default_cache # 访问记录存放在django的缓存中(需设置缓存) scope = "user" # 构造缓存中的key different API can have different scope cache_format = 'throttle_%(scope)s_%(ident)s' # 设置访问频率,例如:1分钟允许访问10次 # 其他:'s', 'sec', 'm', 'min', 'h', 'hour', 'd', 'day' THROTTLE_RATES = {"user": "10/m"} #scope : rate def get_cache_key(self, request, view): if request.user: ident = request.user.pk # 用户ID else: ident = self.get_ident(request) # 获取请求用户IP(去request中找请求头) # throttle_u # throttle_user_11.11.11.11ser_2 return self.cache_format % {'scope': self.scope, 'ident': ident} def throttle_failure(self): wait = self.wait() detail = { "code": 1005, "data": "访问频率限制", 'detail': "需等待{}s才能访问".format(int(wait)) } raise ThrottledException(detail)``` python REST_FRAMEWORK = { 'DEFAULT_VERSIONING_CLASS': 'rest_framework.versioning.NamespaceVersioning' } ``` - View.py ``` python class ProfileList(APIView): versioning_class = versioning.QueryParameterVersioning ``` --
Version schema heading:: 3
- AcceptHeaderVersioning heading:: 3
GET bookings HTTP/1.1 Host: example.com Accept: application/json; version=1.0 - URLPathVersioning heading:: 3
GET /v1/bookings/ HTTP/1.1 Host: example.com Accept: application/json
- NamespaceVersioning heading:: 3urlpatterns = [ re_path( r'^(?P<version>(v1|v2))/bookings/$', bookings_list, name='bookings-list' ), re_path( r'^(?P<version>(v1|v2))/bookings/(?P<pk>[0-9]+)/$', bookings_detail, name='bookings-detail' ) ]GET bookings HTTP/1.1 Host: v1.example.com Accept: application/json
- QueryParameterVersioning heading:: 3# bookings/urls.py urlpatterns = [ re_path(r'^$', bookings_list, name='bookings-list'), re_path(r'^(?P<pk>[0-9]+)/$', bookings_detail, name='bookings-detail') ] # urls.py urlpatterns = [ re_path(r'^v1/bookings/', include('bookings.urls', namespace='v1')), re_path(r'^v2/bookings/', include('bookings.urls', namespace='v2')) ]GET something?version=0.1 HTTP/1.1 Host: example.com Accept: application/json - Reverse URL heading:: 3 - [[../assets/image-20210820105543193-3386187_1696666581416_0.png]] - [[../assets/image-20210820112152615_1696666677979_0.png]] - Request parsing heading:: 2 desc:: REST framework includes a number of built in Parser classes, that allow you to accept requests with various media types. There is also support for defining your own custom parsers - Jsonparser [[../assets/image-20210827081058194_1696668405368_0.jpg]] - File parser (MultiPartParser) - [[../assets/image-20210827083047327_1696668472683_0.jpg]] - File uploader - [[../assets/image-20210827084403453_1696668497009_0.jpg]] - - - Content negotiation heading:: 2 desc:: Content negotiation is the process of selecting one of multiple possible representations to return to a client, based on client or server preferences. url:: Content negotiation - Django REST framework - The client need specify
content-typeand the value should be valid httpmedia type- the config is throughparser_classesandcontent_negotiation_classGlobal setting
- When the code refer to request.data it will trigger the parser - Most usedREST_FRAMEWORK = { 'DEFAULT_CONTENT_NEGOTIATION_CLASS': 'myapp.negotiation.IgnoreClientContentNegotiation', }JSONParserandFormParserxx, to upload fileFileUploaderParser, Large fileMultiPartParser- If not specifed or content does not match parser, a exception will be throw - - - Serializers heading:: 2 desc:: Serializers allow complex data such as querysets and model instances to be converted to native Python datatypes that can then be easily rendered into JSON, XML or other content types. Serializers also provide deserialization, allowing parsed data to be converted back into complex types, after first validating the incoming data. - Declaring Serializers heading:: 3 - In a sense, Serializers is similar to ((651cfa1b-ce5c-486b-8f45-5f3cee8f113e)) - Create a serializer forComment``` python from datetime import datetime class Comment: def __init__(self, email, content, created=None): self.email = email self.content = content self.created = created or datetime.now() comment = Comment(email='leila@example.com', content='foo bar') from rest_framework import serializers class CommentSerializer(serializers.Serializer): email = serializers.EmailField() content = serializers.CharField(max_length=200) created = serializers.DateTimeField() ```- Serializing object
heading:: 3
- use CommentSerializer to serialize a comment, or list of comments
python
  serializer = CommentSerializer(comment)
  serializer.data
  # {'email': 'leila@example.com', 'content': 'foo bar', 'created': '2016-01-27T15:17:10.375877'}
  comments = [comment, comment] # array of objects
  serializer = CommentSerializer(comments, many=True)
  serializer.data # a list of objects
  from rest_framework.renderers import JSONRenderer

  json = JSONRenderer().render(serializer.data)
- use CommentSerializer to serialize a comment, or list of comments
- Deserializing heading:: 3
- ModelSerializer heading:: 3 desc:: serializer classes that map closely to Django model definitions. - Theimport io from rest_framework.parsers import JSONParser stream = io.BytesIO(json) data = JSONParser().parse(stream) serializer = CommentSerializer(data=data) serializer.is_valid() # True serializer.validated_data # {'content': 'foo bar', 'email': 'leila@example.com', 'created': datetime.datetime(2012, 08, 22, 16, 20, 09, 822243)}ModelSerializerclass provides a shortcut that lets you automatically create a Serializer class with fields that correspond to the Model fields. It based onSerializerclass and * It will automatically generate a set of fields for you, based on the model. * It will automatically generate validators for the serializer, such as unique_{ together} validators. * It includes simple default implementations of.create()and.update(). - Declaring heading:: 4``` python class AccountSerializer(serializers.ModelSerializer): class Meta: model = Account fields = ['id', 'account_name', 'users', 'created'] # similar to ModelForm, you can use fields = '__all__' read_only_fields = ['account_name'] ``` - `read_only` and `write_only` - `read_only` can be used for output serializer it can be shown in response - `write_only` used for input data serializer, e.g. password/token field - choice fields and foreign key heading:: 4 - e.g. gender: ((1:'male'), (2, 'female')) depart was defined as foreign key to department table (id, name) ``` python # model gender: ((1:'male'), (2, 'female')) class AccountSerializer(serializers.ModelSerializer): gender_info = serializers.CharField(source='get_gender_display', read_only=True) depart = serializers.CharField(source='depart.title') #show department title class Meta: model = Account fields = ['id', 'account_name', 'users', 'created', 'gender_info', 'depart'] extra_kwargs = {'gender': {'write_only': True}} ``` - It follow conventions of Django ModelForm - Use a new name `gender_info` because when write to DB we want a number 1|2, when read and show in API we want string of male|female - define own field heading:: 4 ``` python class AccountSerializer(serializers.ModelSerializer): class Meta: model = Account fields = ['xxx'] def get_xxx(self, obj): return obj.first_name + obj.last_name ``` - nested and embed heading:: 4 - Suppose there are multiple tables with 1:1 or m:n relations ``` python from django.db import models class Role(models.Model): title = models.CharField(verbose_name="标题", max_length=32) order = models.IntegerField(verbose_name="顺序") class Tag(models.Model): caption = models.CharField(verbose_name="名称", max_length=32) class UserInfo(models.Model): name = models.CharField(verbose_name="姓名", max_length=32) gender = models.SmallIntegerField(verbose_name="性别", choices=((1, "男"), (2, "女"))) role = models.ForeignKey(verbose_name="角色", to="Role", on_delete=models.CASCADE) ctime = models.DateTimeField(verbose_name="创建时间", auto_now_add=True) tags = models.ManyToManyField(verbose_name="标签", to="Tag") ``` - You can create a new ModelSerializer ``` python from rest_framework.views import APIView from rest_framework.response import Response from rest_framework import serializers from api import models class RoleSerializer(serializers.ModelSerializer): class Meta: model = models.Role # fields = "__all__" fields = ["id", 'title'] class TagSerializer(serializers.ModelSerializer): class Meta: model = models.Tag fields = "__all__" class InfoSerializer(serializers.ModelSerializer): role = RoleSerializer() tags = TagSerializer(many=True) class Meta: model = models.UserInfo fields = ['id', 'name', "role", "tags"] class InfoView(APIView): def get(self, request): queryset = models.UserInfo.objects.all() ser = InfoSerializer(instance=queryset, many=True) print(type(ser.data), ser.data) return Response(ser.data) ``` - Inheritances heading:: 4 ``` python from rest_framework.views import APIView from rest_framework.response import Response from rest_framework import serializers from api import models class MySerializer(serializers.Serializer): more = serializers.SerializerMethodField() def get_more(self, obj): return "123" # inherit MySerializer class InfoSerializer(serializers.ModelSerializer, MySerializer): class Meta: model = models.UserInfo fields = ["id", "name", 'more'] class InfoView(APIView): def get(self, request): instance = models.UserInfo.objects.all().first() ser = InfoSerializer(instance=instance, many=False) print(type(ser.data), ser.data) return Response(ser.data) ``` - Save/Update data heading:: 4 - save()/ update() method heading:: 4 ``` python serializer = CommentModelSerializer(data=data) serializer.save() # for non model serializer serializer = CommentNonModelSerializer(data=data) serializer.validated_data.pop('confirm_password') # there are filed should not save into database models.Comment.objects.create(**serializer .validate_data) ``` - In save(), you can add additional fields heading:: 4 ``` python serializer.save(updated = datetime.now(), updated_by = request.user ) ``` - Foreign key and many to many heading:: 4 - When validate/save foriegn key, DRF will check if the key is valid or not - It also apply when M2N is passed e.g. {'tags': [1, 1111]}, if `1111` not existed in M2N table, validation will fail - Override `to_presentation` - If you need to show something in DB in a more friendly way (beyond `display_xxx`) You can override `to_presentation` - [[../assets/image_1696746627345_0.png]] ``` python class SbModelSerializer(NbHookSerializer, serializers.ModelSerializer): class Meta: model = models.NbUserInfo fields = ["id", "name", "age", "gender"] extra_kwargs = { "id": {"read_only": True} } def nb_gender(self, obj): # YOu can define your own getter here return obj.get_gender_display() def nb_name(self, obj): return obj.get_gender_display() class SbView(APIView): def post(self, request, *args, **kwargs): ser = SbModelSerializer(data=request.data) # the to_presentation was overrided if ser.is_valid(): ser.save() return Response(ser.data) else: return Response(ser.errors) ```- Under the hood
- [[../assets/image-20210823235752483_1696691331872_0.jpg]]
- [[../assets/image-20210824001814091_1696723163568_0.jpg]]
- [[../assets/image-20210824001844381_1696723308136_0.jpg]]
- Validator heading:: 2 desc:: validation logic into reusable component, DRF validation is performed entirely on the serializer class.
- Samples
- Model serializer validations - You can set it up for more complicated validations schemasclass CustomerReportRecord(models.Model): time_raised = models.DateTimeField(default=timezone.now, editable=False) reference = models.CharField(unique=True, max_length=20) description = models.TextField() # if meta set to CustomerReportRecord, reference max_len will be 20 class CustomerReportModelSerializer(serializers.ModelSerializer): class Meta: model = CustomerReportRecord #This works as well class CustomerReportSerializer(serializers.Serializer): reference = serializers.CharField(required=True, max_length=20, min_length=4) description = serializers.CharField(required=True, max_length=20) # email = serializers.EmailField() # implemented email validation email = serializers.CharField( validators=[EmailValidator("email format invalid")]) mobile = serializers.CharField( validators=[RegexValidator(r"\d+", message="number only")])``` python class BillingRecordSerializer(serializers.ModelSerializer): def validate(self, attrs): # Apply custom validation either here, or in the view. class Meta: fields = ['client', 'date', 'amount'] validators = [ UniqueForYearValidator( queryset=BlogPostItem.objects.all(), field='slug', date_field='published' ) ] extra_kwargs = { 'client': {'required': False}, 'title': {'max_length': 10}, 'phone': {'validators': [RegexValidator(r'\d+', message='phone number')]}, } # validators = [] # Remove a default "unique together" constraint. ```-
Validator hook
- Put inside CustomerReportSerializer
- Validation error exception will be captured in DRF and convert to error response - Validate a requestclass CustomerReportSerializer(serializers.Serializer): def validate_phone(self, value): # validate {'phone': '02233221123', ...} if len(value) < 10: raise exception.ValidationError("incorrect phone number length") return value def validate(self, attrs): # this validate all fields # api_settings.NON_FIELD_ERRORS_KEY if len(attrs['country'] == 'AU' and len(attrs['mobile']) < 11: raise exceptions.ValidationError('incorrect mobile for AU')
Login, session and cookie
An *HTTP cookie* (web cookie, browser cookie) is a small piece of data that a server sends to a user's web browser. The browser may store the cookie and send it back to the same server with later requests. Typically, an HTTP cookie is used to tell if two requests come from the same browser—keeping a user logged in, for example. It remembers stateful information for the stateless HTTP protocol.
Cookies are mainly used for three purposes:
Session management, e.g. Logins, shopping carts, game scores, or anything else the server should remember
Personalization, e.g. User preferences, themes, and other settings
Tracking. Recording and analyzing user behavior
sessions are saved on the server side while cookies are saved on the client side.
Cross Site Request Forgery protection
The CSRF middleware and template tag provides easy-to-use protection against Cross Site Request Forgeries. This type of attack occurs when a malicious website contains a link, a form button or some JavaScript that is intended to perform some action on your website, using the credentials of a logged-in user who visits the malicious site in their browser.
csrf_exempt(view)
This decorator marks a view as being exempt from the protection ensured by the middleware. Example:
from django.http import HttpResponse
from django.views.decorators.csrf import csrf_exempt
@csrf_exempt
def my_view(request):
    return HttpResponse("Hello world")
csrf_protect(view)
Decorator that provides the protection of CsrfViewMiddleware to a view. Usages:
    from django.shortcuts import render
    from django.views.decorators.csrf import csrf_protect
    @csrf_protect
    def my_view(request):
        return render(request, "a_template.html", {})
requires_csrf_token(view)
Normally the csrftoken template tag will not work if CsrfViewMiddleware.processview or an equivalent like csrfprotect has not run. The view decorator ~requirescsrftoken~ can be used to ensure the template tag does work.
Session
django session
session
Default session setup
setting.py
    SESSION_ENGINE = 'django.contrib.sessions.backends.db' # 引擎(默认)
    # use 'django.contrib.sessions.backends.cached_db' for high traffic
    SESSION_COOKIE_NAME = "sessionid" # Session的cookie保存在浏览器上时的key,即:sessionid=随机字符串(默认)
    SESSION_COOKIE_PATH = "/" # Session的cookie保存的路径(默认)
    SESSION_COOKIE_DOMAIN = None # Session的cookie保存的域名(默认)
    SESSION_COOKIE_SECURE = False # 是否Https传输cookie(默认)
    SESSION_COOKIE_HTTPONLY = True # 是否Session的cookie只支持http传输(默认)
    SESSION_COOKIE_AGE = 1209600 # Session的cookie失效日期(2周)(默认)
    SESSION_EXPIRE_AT_BROWSER_CLOSE = False # 是否关闭浏览器使得Session过期(默认)
    SESSION_SAVE_EVERY_REQUEST = False # 是否每次请求都保存Session,默认修改之后才保存(默认)
Cookie
request.COOKIES[key]
request.COOKIES.get(key)
# 普通cookie是明文传输的,可以直接在客户端直接打开,所以需要加盐,解盐之后才能查看
request.get_signed_cookie(key, default=RAISE_ERROR, salt='', max_age=None)
Login HTML
{% raw %}
<div class="account">
    <h2>用户登录</h2>
    <div class="panel-body">
        <form method="post" novalidate>
            {% csrf_token %}
            <div class="form-group">
                <label>用户名</label>
                {{ form.username }}
                <span style="color: red;">{{ form.errors.username.0 }}</span>
            </div>
            <div class="form-group">
                <label>密码</label>
                {{ form.password }}
                <span style="color: red;">{{ form.errors.password.0 }}</span>
            </div>

            <button type="submit" class="btn btn-primary center-block" style="width: 80px;">登录</button>
        </form>
    </div>
</div>
{% endraw %}
Login Form
from django.shortcuts import render, HttpResponse
from django import forms
from employee_management.utils.modelform import BootStrapForm
from employee_management.utils.encrypt import md5
from employee_management.models import Admin

# 使用Form来实现
class LoginForm(BootStrapForm):
    username = forms.CharField(
        label="用户名",
        widget=forms.TextInput(attrs={"class": "form-control"}),
        required=True,
    )
    password = forms.CharField(
        label="用户名",
        # render_value=True 表示当提交后,如果密码输入错误,不会自动清空密码输入框的内容
        widget=forms.PasswordInput(attrs={"class": "form-control"}, ),
        required=True,
    )

    def clean_password(self):
        pwd = self.cleaned_data.get("password")
        return md5(pwd)
def login(request):
    """登录"""
    if request.method == "GET":
        form = LoginForm()
        return render(request, 'login.html', {"form": form})

    form = LoginForm(data=request.POST)
    if form.is_valid():
        # 验证成功, 获取到的用户名和密码
        # print(form.cleaned_data)
        # {'username': '123', 'password': '123'}
        # {'username': '456', 'password': '0f54af32f41a5ba8ef3a2d40cd6ccf25'}

        # 去数据库校验用户名和密码是否正确
        admin_object = Admin.objects.filter(**form.cleaned_data).first()
        if not admin_object:
            form.add_error("password", "用户名或密码错误")
            return render(request, 'login.html', {"form": form})

        # 如果用户名密码正确
        # 网站生成随机字符创,写到用户浏览器的cookie中,再写入到服务器的session中
        request.session["info"] = {'id': admin_object.id, 'name': admin_object.username}
        return redirect("/admin/list/")

    return render(request, 'login.html', {"form": form})
Session storage
The request object has a session attribute, and when the server executes the code, the session middleware and the session’s application operate together seamlessly. When you first store data in a session, Django saves the data server-side and associates it with a unique session ID. The server-side session data (object) is created when you store any data in the session and is saved either at the end of the request or when you explicitly call. The sessionid cookie is created client-side when you first store any data in the session.
mysql> select * from django_session;
+----------------------------------+-------------------------------------------------------------------------------------------------+----------------------------+
| session_key                      | session_data                                                                                    | expire_date                |
+----------------------------------+-------------------------------------------------------------------------------------------------+----------------------------+
| zkgq26t7hqx3yu6xo04bws856002n5aj | eyJpbmZvIjp7ImlkIjoxMiwibmFtZSI6InRva2VyIn19:1pElim:Tus2mHaJUTNTfzhppuah8N0FVdLXQxyvRk_4n-4fP6g | 2023-01-23 06:33:24.373104 |
+----------------------------------+-------------------------------------------------------------------------------------------------+----------------------------+
``` sql

mysql\> select \* from django~session~;

  ---------------------------------- -------------------------------------------------------------------------------------------------- -----------------
  session~key~                       session~data~                                                                                      expire~date~

  zkgq26t7hqx3yu6xo04bws856002n5aj   eyJpbmZvIjp7ImlkIjoxMiwibmFtZSI6InRva2VyIn19:1pElim:Tus2mHaJUTNTfzhppuah8N0FVdLXQxyvRk~4n~-4fP6g   2023-01-23
                                                                                                                                        06:33:24.373104
  ---------------------------------- -------------------------------------------------------------------------------------------------- -----------------
Django Middleware
Class with process_request Input middleware
if processrequest return anything, the request will not forward to view.py, it will return the result
if nothing return, continue with next middleware and then go to view
proccess_response(self, request, response) output middleware
Auth middleware
middleware/auth.py
from django.utils.deprecation import MiddlewareMixin
from django.shortcuts import HttpResponse, redirect


class AuthMiddleware(MiddlewareMixin):

    def process_request(self, request):

        # 0.排除不需要的页面 否则容易死循环【【【
        if request.path_info == "/login/":
            return

        # 1.读取当前访问的用户的session信息,如果能读到,说明已登录过,就可以继续向后走
        info_dict = request.session.get("info")
        if info_dict:
            return

        # 2.如果没有登录信息
        return redirect("/login/")
setting.py
MIDDLEWARE = [
    'django.middleware.security.SecurityMiddleware',
    'django.contrib.sessions.middleware.SessionMiddleware',
    'django.middleware.common.CommonMiddleware',
    'django.middleware.csrf.CsrfViewMiddleware',
    'django.contrib.auth.middleware.AuthenticationMiddleware',
    'django.contrib.messages.middleware.MessageMiddleware',
    'django.middleware.clickjacking.XFrameOptionsMiddleware',
    'employee_management.middleware.auth.AuthMiddleware',
]
logout
clean session data
view.py
reference
Django REST API
| Udemy]]
KickStart
manage.py command line
runserver
makemigrations
- create a new migration plan
migrate
createsuperuser
startapp
- create a new app/rest API
shell
help
/admin URL for admin user
A django APP
An app in a Django project is a Python package that does a particular job. A Django project contains one or more apps and each of them handles a particular task. For example, a Django blog website will have a list of posts, user authentication, user profiles, etc. The best practice is to create different apps for each one of them.
Apps are meant to be portable and can be shared between different projects. For example, a Django e-commerce website and a Django blog website both will have user authentication. You can make a single app for user authentication and share it between different Django projects.
create a new APP
Project structure
project structure
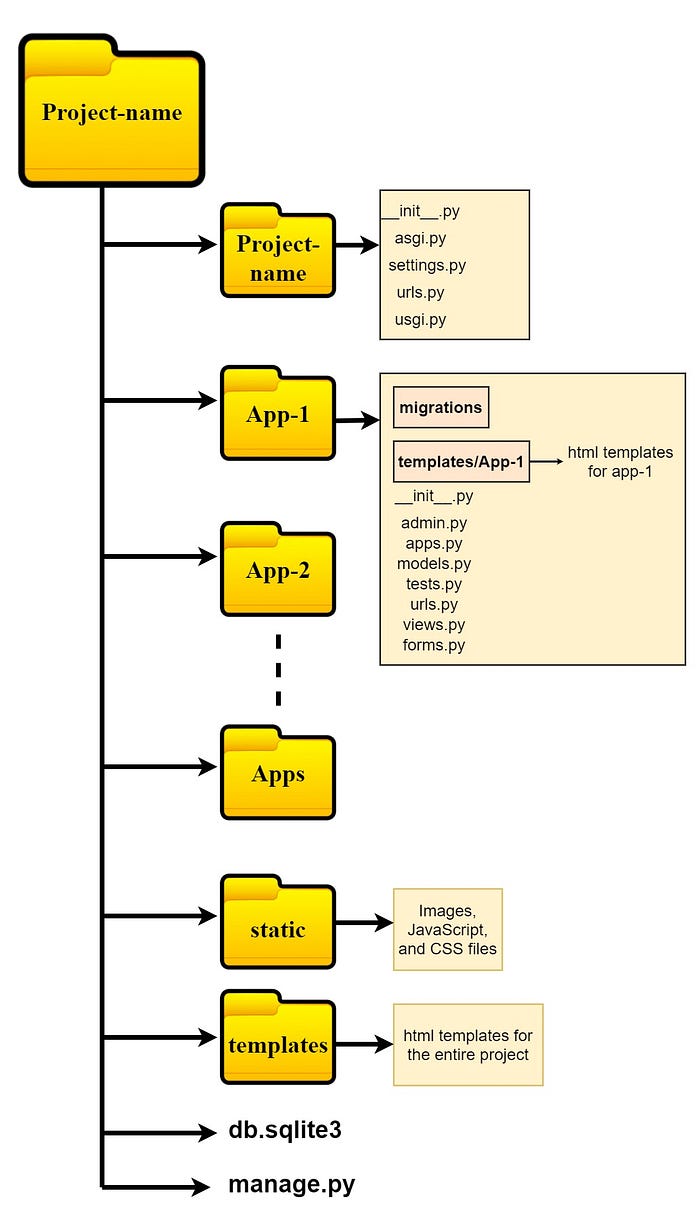
`manage.py~ file provides a command-line utility for a Django project.
*** asgi stands for Asynchronous Server Gateway Interface and ~wsgi` stands for *Web Server Gateway Interface.*
-
After your development process is completed, you will move to production and hosting. For hosting you will use ~asgi~ or ~wsgi~ compatible servers. According to the type of server you use, you have to import middleware accordingly.
-
~asgi.py~ enables ASGI compatible servers and ~wsgi.py~ enables WSGI compatible servers to serve your Django web app.
settings.py
-
This is the main configuration file for a Django project. This is the main settings file and here you will configure all the apps and middleware for your project.
-
This file also handles the database settings. By default Django uses sqlite3. But if you use a different database, which you will most probably do, you will configure it in ~settings.py~.
-
~settings.py~ also handles templates, static files, and media files related settings.
urls.py
- URLs are different endpoints of your website. ~urls.py~ contains the URL configurations for your website. By default, ~urls.py~ comes with the URL pattern for the admin panel. You will create other endpoints for your web app in this file.
Inside your APP
-
admin.py
-
This file is used to register the models in your app in the Django administration. You will use this file to display the models of your app in the admin panel.
-
e.g. register article
-
-
app.py
- It is a common configuration file for all Django apps. You can configure the attributes for your app using this file. However, the default configuration is sufficient for most cases. So, adding app configuration is a rare case.
-
~migrations~ folder
- Once you start making changes in your database, the ~migrations~ folder will be populated with the records for all those migrations.
-
models.py
-
You create your models in this file. Models define the database structure of your app. In ~models.py~ you basically create database tables for your app with proper relationships using Python classes.
-
~models.py~ is one of the most important files in your app. Django follows the MVT (Model-View-Template) design architecture. The 'M' represents models. So, models are one of the basic components of a Django app.
-
views.py
-
is another important file. Views are the 'V' of MVT. Views provide an interface through which users interact with a Django website. It connects models and templates together.
-
In this file, you write the business logic for your app. A view can be either function-based or class-based. You decide if you want to write your views using functions or classes.
-
You can learn more about the MVT architecture from this article:
-
-
tests.py
- is where you write test codes for your app. It is used to test the overall working of a Django app.
Other folder/files
-
Templates
-
django MVT *T*emplate
-
each app can have own template and the search sequence is defined same as how different app is loaded
-
-
static
-
css, js, images, json..
-
{% raw %}{% load static %}{% endraw %}to load static files 👍 -
{% raw %}{% static 'css/bootstrap.css' %}{% endraw %}to refer to those files
-
-
urls.py in app
- if your application is complex, use a dedicatd url.py
-
forms.py
- If your website expects to receive user inputs you need to
use forms.
To work with forms in an app you need to create the
forms.pyfile in that app. Here you will write the codes to handle forms.
- If your website expects to receive user inputs you need to
use forms.
To work with forms in an app you need to create the
Request and response Request & Response 4.2
Requests
-
method, GET, POST (used for form submit), META
-
Query parameters
/query/?id=123#card-
request.Get.get('id')
-
Reponse
- HttpResponse; render; redirect
Models
Default and AutoField
BigAutoField(64bit) and AutoField
app.py set default auto field
- if defaultautofield present, each table will have
idand you do not need to define aut-inc auto field
ForeignKey and auto join
define a foreigh key relationship #card
depart = models.ForeignKey(
  "Department",
  on_delete=models.CASCADE
xx)
# table "Department", to_field='id'
# if 'id' is default (auto_field) to_field can be ignore
card
-
djangowill appendidand createdepart_idautomatically fromdepartfor foreign key #magic -
on_deleteshould be specified. NormallyCASCADE, can also beSET_NULLif it is nullable
AutoJoin
-
Instead of join two table to get info from 2nd table like this
user = model.User.objects.filter(id=1).first()
user_depart = models.Department.objects.filter(id=user.depart_id).first()
Django know how two table are associated and We can dereference department info with
departfield directly withoutfilter(id=user.depart_id)
enum with choices
define with {field_name}_choices
gender_choices = ( (1,"Male"),(2,"Female") )
gender = models.SmallIntegerField(choices=gender_choices,default=1)
when retrieve gender value, it will be ½. But it can be display nicely with #magic method models.get_{field_name}_display() e.g. get_gender_display() will show Male|Female
order_by()
order_by("field_name")
reverse order with order_by("-field_name")
* *
filter() with magic naming
filter with field and value (field name : myid in all examples )
Number filter
filter(myid__gt=12)-> value >12, You can also filter onmyid__ltemyid_ltetc
String filter
mytext__startwith,mytext__endwith,mytext__contains
Multi field filter : filter(myid_gte=12, mytext_contains="123")
pagination
*
Django Template
Abstract
A template is a text file. It can generate any text-based format (HTML, XML, CSV, etc.).
A template contains *variables*, which get replaced with values when the template is evaluated, and *tags*, which control the logic of the template.
-----
:main-idea-checkbox:
- What is this aims?
- What is the their research question?
- What is the author arguing?
- What is their answer to the question?
- What points support their argument?
- What are their main reasons?
- What evidence have they used to support their argument?
- What’s the significance of these facts?
- What principle are they based on?
- How can I apply them? How do they fit in with what I already know?
- What’s beyond them?
- What're supporting details and explanations?
::: {.END .drawer} :::
Cheatsheet
{{ var1 }}
{{ listVar.1 }} <!-- listVar[0] -->
{% raw %}{% for item in lst %}{% endraw %}  <!-- loop list -->
<span> {{ item }} </span>
{% raw %}{% endfor %}{% endraw %}

<span> {{ dict }} </span> <!-- object  -->
<span> {{ dict.name }} </span> <!-- object attribute -->

{{ list.1.name }}  <!-- list[1].name
Loop and condition
{% raw %}{% for item in dict.keys %}{% endraw %}  <!-- loop object  -->
<span> {{ item }} </span>
{% raw %}{% endfor %}{% endraw %}

{% raw %}{% for k, v in dict.items %}{% endraw %}  <!-- loop object  -->
<span> {{ k }} = {{ v }} </span>
{% raw %}{% endfor %}{% endraw %}

{% raw %}{% if n == 'xxx' %}{% endraw %}
<h1> xxxx </h1>
{% raw %}{% elif n == "XXX" %}{% endraw %}
<h1> XXX </h1>
{% raw %}{% else %}{% endraw %}
<h1> ssss </h1>
{% raw %}{% endif %}{% endraw %}
Template tags {% raw %}{% ... %}{% endraw %} generally do not require double curly braces or quotes for variable names, as they inherently expect Python-like syntax.
value="{{ title|default:'depart name' }}" or value={{ title|default:'depart name' }}
- double quotes is strongly recommended
Call a function inside {{}} or {% raw %}{% %}{% endraw %}
-
{{ obj.get_gender_display() }}is invalid. You can not call a function with()inside{{}}, use{{ obj.get_gender_display }}instead -
How about arguments? see ((651c1c60-a6bd-47c4-9b9a-889f3d41cf5f))
Template extends
extends tag is used for inheritance of templates in django. One needs to repeat the same code again and again. Using extends we can inherit templates as well as variables.
syntax
{% raw %}{% extends 'template_name.html' %}{% endraw %}

# examples
{% raw %}{% extends "./base2.html" %}{% endraw %}
{% raw %}{% extends "../base1.html" %}{% endraw %}
{% raw %}{% extends "./my/base3.html" %}{% endraw %}
extends examples
-
template.html
-
extends.html overwrite block: content
-
block can extends anything, e.g css reference, js code blocks etc
pipe operator | and filter
In Django template language, the pipe character | is used to apply filters to variables. Filters are used to format variables or perform some operation on them before they are rendered in the template.
Syntax
|join:", ": Thejoinfilter concatenates items in the list into a single string, using ~, ~(comma and space) as a separator.
As function call with parameter is not allowed inside template, do this instead
<td class="py-2 px-4">{{ obj.create_time.strftime('%Y-%m-%d') }}</td>
Should be write as
<td class="py-2 px-4">{{ obj.create_time | date:'Y-m-d' }}</td>
include another template file
top.html
index.html
<!DOCTYPE html>
<html lang="en">
<head>
    <meta charset="UTF-8">
    <title>Title</title>
</head>
<body>

{% raw %}{% include 'top.html' with mycss="acss" %}{% endraw %}

<h2> 网页body部分 </h2>

</body>
</html>
include passing multiple values
And with django variables from python codes
{% raw %}{% extends 'base.html' %}{% endraw %}

{% raw %}{% block panel %}{% endraw %}
{% raw %}{% include 'form.html' with title=title id=id %}{% endraw %}
{% raw %}{% endblock %}{% endraw %}
Form
Django’s form functionality can simplify and automate vast portions of this work, and can also do it more securely than most programmers would be able to do in code they wrote themselves.
Django handles three distinct parts of the work involved in forms:
preparing and restructuring data to make it ready for rendering
creating HTML forms for the data
receiving and processing submitted forms and data from the client
flowChart-1
Create a form
How to create a FormClass #card
-
Sample
from django import forms

class FormName(forms.Form):
         # each field would be mapped as an input field in HTML
        field_name = forms.Field(**options)
card #card
Form class sample
from django import forms

class InputForm(forms.Form):
    first_name = forms.CharField(max_length = 200)
    last_name = forms.CharField(max_length = 200)
    roll_number = forms.IntegerField(
                    help_text = "Enter 6 digit roll number"
                    )
    password = forms.CharField(widget = forms.PasswordInput())
- Note if field defined as
auto(auto_now,auto_now_add), it may not shown in Form
Form view.py
from django.shortcuts import render
from .forms import InputForm
def home_view(request):
    context ={}
    context['form']= InputForm()
    return render(request, "home.html", context)
Render in template
-
A form comes with 3 in-built methods that can be used to render Django form fields.
-
{{ form.as_table }}will render them as table cells wrapped in \<tr> tags -
{{ form.as_p }}will render them wrapped in \<p> tags -
{{ form.as_ul }}will render them wrapped in \<li> tags
Template:
There are a few ways to present form objects
- Field by field
<form action = "" method = "post">
    {{ form.first_name }}
    {{ form.last_name }}
    {{ form.phone_number }}
    <input type="submit" value=Submit">
</form>
- Loop
<form action = "" method = "post">
    {% raw %}{% csrf_token %}{% endraw %}
    {% raw %}{% for field in form %}{% endraw %}
    {{ field }}
    {% raw %}{% endfor %}{% endraw %}
    <input type="submit" value=Submit">
</form>
{{ form }}
<form action = "" method = "post">
    {% raw %}{% csrf_token %}{% endraw %}
    {{ form }}
    <input type="submit" value=Submit">
</form>
Validate a form object
The easiest way to validate a single field is to override the method clean_<fieldname>() for the field you want to check. e.g. Validate renewal_date field
import datetime
from django import forms
from django.core.exceptions import ValidationError
from django.utils.translation import gettext_lazy as _
class RenewBookForm(forms.Form):
    renewal_date = forms.DateField(help_text="Enter a date between now and 4 weeks (default 3).")

    def clean_renewal_date(self):
        data = self.cleaned_data['renewal_date']
        # Check if a date is not in the past.
        if data < datetime.date.today():
            raise ValidationError(_('Invalid date - renewal in past'))

        # Check if a date is in the allowed range (+4 weeks from today).
        if data > datetime.date.today() + datetime.timedelta(weeks=4):
            raise ValidationError(_('Invalid date - renewal more than 4 weeks ahead'))

        # Remember to always return the cleaned data.
        return data
Django Form from Models
If the form is coupled with database table, it is easy to use ModelForm
Models
-
Sample:
from django.db import models class Movie(models.Model): movie_title = models.CharField(max_length=150) release_year = models.IntegerField() director = models.CharField(max_length=100) movie_poster = models.ImageField(upload_to='images/', None=True) movie_plot = models.TextField() def __str__(self): return self.movie_title # when print movie object it shows title. Also useful #when movie object is showed in dropdown etc -
FieldValidator
-
django.core.validators
-
-
A disabled field
- For read only field set
disabled=True, e.g.mobile = forms.CharField(disabled=True, label='mobile number')
- For read only field set
Create ModelForm class
-
How to create a ModelForm Class #card
-
Code
-
-
Sample
-
The
Metaclass is used to change the behavior of theModelForm. Within it, specify the model your fields come from and the fields you want to use from that model. -
Key components of
Metaclass in ModelForm #card-
model the data model class
-
fields: the fields will be shown in the form
-
widgets: used to generate HTML code that override default behavior. e.g. inputbox with CSS styling
-
-
Explains of Meta class
modelThe Model classfieldsIt is strongly recommended that you explicitly set all fields that should be edited in the form using the fields attribute. Failure to do so can easily lead to security problems when a form unexpectedly allows a user to set certain fields, especially when new fields are added to a model. If those are not your concerns ~fields = "[[all]{.underline}]{.underline}" ~ can easy your jobexcludeSet the exclude attribute of the ModelForm’s inner Meta class to a list of fields to be excluded from the form.
field_classesor formfieldcallback can be used to customize the type of fields instantiated by the form.widgets: override defaultforms.TextInput, It is helpful if you need setupcsse.g.
class PartialAuthorForm(ModelForm): class Meta: model = Author exclude = ['title'] widgets = { "name": forms.widgets.TextInput(attrs={"class": "form-control"}), "password": forms.widgets.PasswordInput(attrs={"class": "form-control"}), "age": forms.widgets.NumberInput(attrs={"class": "form-control"}), "account": forms.widgets.NumberInput(attrs={"class": "form-control"}), "department": forms.widgets.Select(attrs={"class": "form-control"}), }- If you want to apply same attributes for all field, do this
instead by override
__init__
class UserModelForm(forms.ModelForm): def __init__(self, *args, **kwargs): super().__init__(*args, **kwargs) for name, field in self.fields.items(): field.widget.attrs["class"] = style if name == "password": field.required = False # Make the password field optional field.widget = forms.widgets.PasswordInput(attrs={"class": style}) class Meta: model = UserInfo fields = "__all__" # It can be a list of all fields you want to display # password field can also be setup here # password = forms.CharField(required=False, widget=forms.PasswordInput()) # some field need special attention # can also be put here- Error messages
You can reuse the default error messages. In case the message need to be customered for specific field
-
Add New field to ModelForm
-
e.g. Add password confirm input field
class UserModelForm(forms.ModelForm): confirm_password = forms.CharField( label = "please input password again", widget = forms.PasswordInput(render_value=True) ) def __init__(self, *args, **kwargs): super().__init__(*args, **kwargs) for name, field in self.fields.items(): field.widget.attrs["class"] = style if name == "password": field.required = False # Make the password field optional field.widget = forms.widgets.PasswordInput(attrs={"class": style}) class Meta: model = UserInfo fields = "__all__" -
render_valuesallow pre-fill values
-
The html template
<form method="post" enctype="multipart/form-data">
  {% raw %}{% csrf_token %}{% endraw %}
      {{movie_form}}
      <button class="btn btn-primary my-4" type="submit">Submit</button>
</form>
For ((651b71c9-7e23-4638-a89c-240b474388a8)) Add __str__
class Department(models.Model):
    title = models.CharField(verbose_name="Department", max_length=32)
    def __str__(self):
        return self.title
So that when adding user's department in the dropdown, it will show the
title instead of "Python Object"
Create a ModelForm object #card
-
an empyt object (create a new entry)
form = UserModelForm() -
From a POST request (for parse form submit and save data)
form = userModelForm(request.POST) -
From database instance (foir re-edit data)
form = UserModelForm(instance=models.User.objects.filter(id=id).first()) -
From both POST and database (normally when reedit data when form submission failed)
form = UserModelForm(request.POST, instance=models.User.objects.filter(id=id).first())
Save ModelForm(),
-
You can either parse the POST request and get all fields, You can Also do:
Handle form errors
**
Pagination
with python slicing [start:end]
qs = models.Users.objects.all()
qs = models.Users.objects.filter(id=123)[0:10]
qs = models.Users.objects.filter(id=123)[10:20]

qs = models.Users.objects.filter(id=123).order_by('name')[0:20]
qs = models.Users.objects.filter(id=123).order_by('name')[20:40]

page = int(request.GET.get('page', 1))
qs = models.Users.objects.filter(id=123).order_by('name')[(page-1)*page_size:page*page_size]
django template
Pagination generate by python
from django.utils.safestring import mark_safe
...
total = models.Users.objects.filter(id=123).order_by('name').count()
total_pages = totla//page_size + 1
start = cur_page - 5
end = cur_page + 5
for i in range(start, end + 1):
  sel = '""'
  if i == page:
    sel = f'"active"'
  ele = f'<li class={sel} ><a href="?page={i}">{i}</a></li>'
  page_list.append(ele)
page_string=mark_safe(''.join(page_list))
return render(request, 'list.html', {"queryset": qs, "page_list": page_string})
Template
<ul class="pagination">
    <li><a href="{{ head_page }}" aria-label="Previous"><span aria-hidden="true">首页</span></a></li>
    {{ page_string }}
    <li><a href="{{ end_page }}" aria-label="Next"><span aria-hidden="true">尾页</span></a></li>

</ul>
<br>

<form method="get">
    <div style="display:inline-block; width: 150px;">
        <div class="input-group">
            <span> <input type="text" class="form-control" placeholder="请输入页码" name="page"></span>
            <span class="input-group-btn">
                <button class="btn btn-primary" type="submit">跳转</button>
            </span>
        </div>
    </div>
</form>
FBV and CBV
FBV: Function based View
sample
def my_create_view(request, pk):
  template_name = 'form.html'
  form_class = MyForm

  form = form_class

  if request.method == 'POST':
    form = form_class(request.POST)
    if form.is_valid():
      form.save()
      return HttpResponseRedirect(reverse('list-view'))
  elif request.method == 'PUT':
    return ...
  return render(request, template_name, {'form': form})
# url
CBV: Class based view
use as_view() and internally use dispatch()
Pros
-
reuseablity by inherited another view
-
DRY
-
extendability
Cons
-
Implicit code flow
-
decorators require extra override
sample
class MyCreateView(View):
  template_name = 'form.html'
  form_class = MyForm

  def get(self, request, *args, **kwargs):
    form = self.form_class
    return render(request, template_name, {'form': form})

  def post(self, request, *args, **kwargs):
    form = self.form_class(request.POST)
    if form.is_valid():
      form.save()
      return HttpResonseRedirect(reverse('list-view'))
    else:
      return render(request, self.template_name, {'form': form})
# URL
urlpatterns = [
    url(r'^new/$', MyCreateView.as_view(), name='original-create-view')
    url(r'^new_two/$', MyCreateView.as_view(template_name='other_form.html', form_class='MyOtherForm'), name='modified-create-view')
  ]
Django’s views requirements:
callable. CBV has as_view()
accept HttpRequest as first positional argument
return HttpResponse or raise exception
reference: Django : Class Based Views vs Function Based Views | by Sarthak Kumar | Medium
which should you use
If it is single method (e.g. Get only) use FBV otherwise CBV
Open source projects
django-idcops: idcops 是一个基于Django倾向于数据中心运营商而开发的,拥有数据中心、客户、机柜、设备、跳线、物品、测试、文档等一序列模块的资源管理平台。
bugadmin: 老男孩django项目实战 – 轻量级bug管理平台
Django 2教程
最新Python的web开发全家桶(django+前端+数据库)哔哩哔哩bilibili
2022 python 全新教程 20天【武沛齐最新录制】全栈开发(python基础+面向对象+django+vue)哔哩哔哩bilibili
上述视频配套文档 Django tutorial blog
【推荐】武沛齐老师2023年最新录制最新版 Python全栈开发教程 全套(下集)哔哩哔哩bilibili
((651762db-174b-4e1f-a603-893e71db2c31))2022 Python的web开发(完整版) 入门全套教程,零基础入门到项目实战哔哩哔哩bilibili
Doc and tutorial
* Django web 开发(四) - Django项目实践
Django tutorial blog
*
install
github setup, it depends rust and might need this:
((64c9b153-f65d-4260-abe8-0b04a23afdb3))
cargo install --locked maturin well seems this need to install separately for windows
#+BEGINSRC shell
pacman -S mingw-w64-clang-x8664-python-installer mingw-w64-clang-x8664-python-wheel \ mingw-w64-clang-x8664-python-setuptools-rust mingw-w64-clang-x8664-python-build
python -m venv –system-site-packages venv3
pip install "fastapi[all]"
* *