reference
Django REST API
| Udemy]]
KickStart
manage.py command line
runserver
makemigrations
- create a new migration plan
migrate
createsuperuser
startapp
- create a new app/rest API
shell
help
/admin URL for admin user
A django APP
An app in a Django project is a Python package that does a particular job. A Django project contains one or more apps and each of them handles a particular task. For example, a Django blog website will have a list of posts, user authentication, user profiles, etc. The best practice is to create different apps for each one of them.
Apps are meant to be portable and can be shared between different projects. For example, a Django e-commerce website and a Django blog website both will have user authentication. You can make a single app for user authentication and share it between different Django projects.
create a new APP
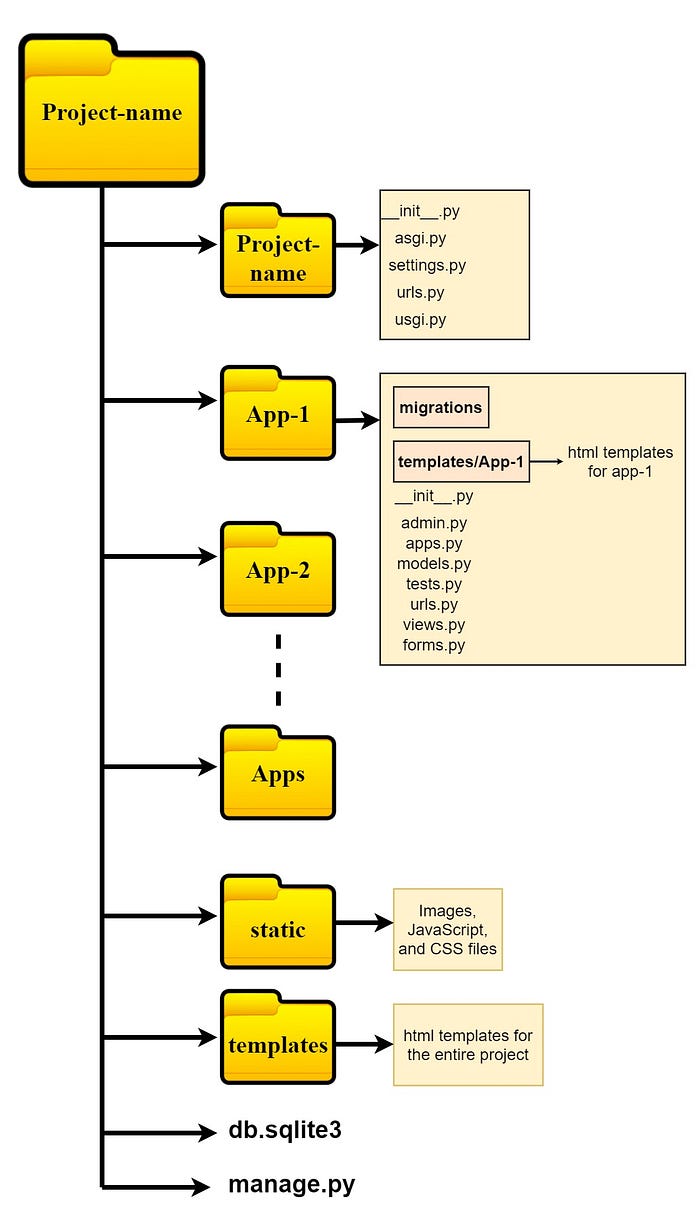
Project structure
project structure
`manage.py~ file provides a command-line utility for a Django project.
*** asgi stands for Asynchronous Server Gateway Interface and ~wsgi` stands for *Web Server Gateway Interface.*
-
After your development process is completed, you will move to production and hosting. For hosting you will use ~asgi~ or ~wsgi~ compatible servers. According to the type of server you use, you have to import middleware accordingly.
-
~asgi.py~ enables ASGI compatible servers and ~wsgi.py~ enables WSGI compatible servers to serve your Django web app.
settings.py
-
This is the main configuration file for a Django project. This is the main settings file and here you will configure all the apps and middleware for your project.
-
This file also handles the database settings. By default Django uses sqlite3. But if you use a different database, which you will most probably do, you will configure it in ~settings.py~.
-
~settings.py~ also handles templates, static files, and media files related settings.
urls.py
- URLs are different endpoints of your website. ~urls.py~ contains the URL configurations for your website. By default, ~urls.py~ comes with the URL pattern for the admin panel. You will create other endpoints for your web app in this file.
Inside your APP
-
admin.py
-
This file is used to register the models in your app in the Django administration. You will use this file to display the models of your app in the admin panel.
-
e.g. register article
-
-
app.py
- It is a common configuration file for all Django apps. You can configure the attributes for your app using this file. However, the default configuration is sufficient for most cases. So, adding app configuration is a rare case.
-
~migrations~ folder
- Once you start making changes in your database, the ~migrations~ folder will be populated with the records for all those migrations.
-
models.py
-
You create your models in this file. Models define the database structure of your app. In ~models.py~ you basically create database tables for your app with proper relationships using Python classes.
-
~models.py~ is one of the most important files in your app. Django follows the MVT (Model-View-Template) design architecture. The 'M' represents models. So, models are one of the basic components of a Django app.
-
views.py
-
is another important file. Views are the 'V' of MVT. Views provide an interface through which users interact with a Django website. It connects models and templates together.
-
In this file, you write the business logic for your app. A view can be either function-based or class-based. You decide if you want to write your views using functions or classes.
-
You can learn more about the MVT architecture from this article:
-
-
tests.py
- is where you write test codes for your app. It is used to test the overall working of a Django app.
Other folder/files
-
Templates
-
django MVT *T*emplate
-
each app can have own template and the search sequence is defined same as how different app is loaded
-
-
static
-
css, js, images, json..
-
{% raw %}{% load static %}{% endraw %}to load static files 👍 -
{% raw %}{% static 'css/bootstrap.css' %}{% endraw %}to refer to those files
-
-
urls.py in app
- if your application is complex, use a dedicatd url.py
-
forms.py
- If your website expects to receive user inputs you need to
use forms.
To work with forms in an app you need to create the
forms.pyfile in that app. Here you will write the codes to handle forms.
- If your website expects to receive user inputs you need to
use forms.
To work with forms in an app you need to create the
Request and response Request & Response 4.2
Requests
-
method, GET, POST (used for form submit), META
-
Query parameters
/query/?id=123#card-
request.Get.get('id')
-
Reponse
- HttpResponse; render; redirect
Models
Default and AutoField
BigAutoField(64bit) and AutoField
app.py set default auto field
- if defaultautofield present, each table will have
idand you do not need to define aut-inc auto field
ForeignKey and auto join
define a foreigh key relationship #card
depart = models.ForeignKey(
  "Department",
  on_delete=models.CASCADE
xx)
# table "Department", to_field='id'
# if 'id' is default (auto_field) to_field can be ignore
card
-
djangowill appendidand createdepart_idautomatically fromdepartfor foreign key #magic -
on_deleteshould be specified. NormallyCASCADE, can also beSET_NULLif it is nullable
AutoJoin
-
Instead of join two table to get info from 2nd table like this
user = model.User.objects.filter(id=1).first()
user_depart = models.Department.objects.filter(id=user.depart_id).first()
Django know how two table are associated and We can dereference department info with
departfield directly withoutfilter(id=user.depart_id)
enum with choices
define with {field_name}_choices
gender_choices = ( (1,"Male"),(2,"Female") )
gender = models.SmallIntegerField(choices=gender_choices,default=1)
when retrieve gender value, it will be ½. But it can be display nicely with #magic method models.get_{field_name}_display() e.g. get_gender_display() will show Male|Female
order_by()
order_by("field_name")
reverse order with order_by("-field_name")
* *
filter() with magic naming
filter with field and value (field name : myid in all examples )
Number filter
filter(myid__gt=12)-> value >12, You can also filter onmyid__ltemyid_ltetc
String filter
mytext__startwith,mytext__endwith,mytext__contains
Multi field filter : filter(myid_gte=12, mytext_contains="123")
pagination
*
Django Template
Abstract
A template is a text file. It can generate any text-based format (HTML, XML, CSV, etc.).
A template contains *variables*, which get replaced with values when the template is evaluated, and *tags*, which control the logic of the template.
-----
:main-idea-checkbox:
- What is this aims?
- What is the their research question?
- What is the author arguing?
- What is their answer to the question?
- What points support their argument?
- What are their main reasons?
- What evidence have they used to support their argument?
- What’s the significance of these facts?
- What principle are they based on?
- How can I apply them? How do they fit in with what I already know?
- What’s beyond them?
- What're supporting details and explanations?
::: {.END .drawer} :::
Cheatsheet
{{ var1 }}
{{ listVar.1 }} <!-- listVar[0] -->
{% raw %}{% for item in lst %}{% endraw %}  <!-- loop list -->
<span> {{ item }} </span>
{% raw %}{% endfor %}{% endraw %}

<span> {{ dict }} </span> <!-- object  -->
<span> {{ dict.name }} </span> <!-- object attribute -->

{{ list.1.name }}  <!-- list[1].name
Loop and condition
{% raw %}{% for item in dict.keys %}{% endraw %}  <!-- loop object  -->
<span> {{ item }} </span>
{% raw %}{% endfor %}{% endraw %}

{% raw %}{% for k, v in dict.items %}{% endraw %}  <!-- loop object  -->
<span> {{ k }} = {{ v }} </span>
{% raw %}{% endfor %}{% endraw %}

{% raw %}{% if n == 'xxx' %}{% endraw %}
<h1> xxxx </h1>
{% raw %}{% elif n == "XXX" %}{% endraw %}
<h1> XXX </h1>
{% raw %}{% else %}{% endraw %}
<h1> ssss </h1>
{% raw %}{% endif %}{% endraw %}
Template tags {% raw %}{% ... %}{% endraw %} generally do not require double curly braces or quotes for variable names, as they inherently expect Python-like syntax.
value="{{ title|default:'depart name' }}" or value={{ title|default:'depart name' }}
- double quotes is strongly recommended
Call a function inside {{}} or {% raw %}{% %}{% endraw %}
-
{{ obj.get_gender_display() }}is invalid. You can not call a function with()inside{{}}, use{{ obj.get_gender_display }}instead -
How about arguments? see ((651c1c60-a6bd-47c4-9b9a-889f3d41cf5f))
Template extends
extends tag is used for inheritance of templates in django. One needs to repeat the same code again and again. Using extends we can inherit templates as well as variables.
syntax
{% raw %}{% extends 'template_name.html' %}{% endraw %}

# examples
{% raw %}{% extends "./base2.html" %}{% endraw %}
{% raw %}{% extends "../base1.html" %}{% endraw %}
{% raw %}{% extends "./my/base3.html" %}{% endraw %}
extends examples
-
template.html
-
extends.html overwrite block: content
-
block can extends anything, e.g css reference, js code blocks etc
pipe operator | and filter
In Django template language, the pipe character | is used to apply filters to variables. Filters are used to format variables or perform some operation on them before they are rendered in the template.
Syntax
|join:", ": Thejoinfilter concatenates items in the list into a single string, using ~, ~(comma and space) as a separator.
As function call with parameter is not allowed inside template, do this instead
<td class="py-2 px-4">{{ obj.create_time.strftime('%Y-%m-%d') }}</td>
Should be write as
<td class="py-2 px-4">{{ obj.create_time | date:'Y-m-d' }}</td>
include another template file
top.html
index.html
<!DOCTYPE html>
<html lang="en">
<head>
    <meta charset="UTF-8">
    <title>Title</title>
</head>
<body>

{% raw %}{% include 'top.html' with mycss="acss" %}{% endraw %}

<h2> 网页body部分 </h2>

</body>
</html>
include passing multiple values
And with django variables from python codes
{% raw %}{% extends 'base.html' %}{% endraw %}

{% raw %}{% block panel %}{% endraw %}
{% raw %}{% include 'form.html' with title=title id=id %}{% endraw %}
{% raw %}{% endblock %}{% endraw %}
Form
Django’s form functionality can simplify and automate vast portions of this work, and can also do it more securely than most programmers would be able to do in code they wrote themselves.
Django handles three distinct parts of the work involved in forms:
preparing and restructuring data to make it ready for rendering
creating HTML forms for the data
receiving and processing submitted forms and data from the client
flowChart-1
Create a form
How to create a FormClass #card
-
Sample
from django import forms

class FormName(forms.Form):
         # each field would be mapped as an input field in HTML
        field_name = forms.Field(**options)
card #card
Form class sample
from django import forms

class InputForm(forms.Form):
    first_name = forms.CharField(max_length = 200)
    last_name = forms.CharField(max_length = 200)
    roll_number = forms.IntegerField(
                    help_text = "Enter 6 digit roll number"
                    )
    password = forms.CharField(widget = forms.PasswordInput())
- Note if field defined as
auto(auto_now,auto_now_add), it may not shown in Form
Form view.py
from django.shortcuts import render
from .forms import InputForm
def home_view(request):
    context ={}
    context['form']= InputForm()
    return render(request, "home.html", context)
Render in template
-
A form comes with 3 in-built methods that can be used to render Django form fields.
-
{{ form.as_table }}will render them as table cells wrapped in \<tr> tags -
{{ form.as_p }}will render them wrapped in \<p> tags -
{{ form.as_ul }}will render them wrapped in \<li> tags
Template:
There are a few ways to present form objects
- Field by field
<form action = "" method = "post">
    {{ form.first_name }}
    {{ form.last_name }}
    {{ form.phone_number }}
    <input type="submit" value=Submit">
</form>
- Loop
<form action = "" method = "post">
    {% raw %}{% csrf_token %}{% endraw %}
    {% raw %}{% for field in form %}{% endraw %}
    {{ field }}
    {% raw %}{% endfor %}{% endraw %}
    <input type="submit" value=Submit">
</form>
{{ form }}
<form action = "" method = "post">
    {% raw %}{% csrf_token %}{% endraw %}
    {{ form }}
    <input type="submit" value=Submit">
</form>
Validate a form object
The easiest way to validate a single field is to override the method clean_<fieldname>() for the field you want to check. e.g. Validate renewal_date field
import datetime
from django import forms
from django.core.exceptions import ValidationError
from django.utils.translation import gettext_lazy as _
class RenewBookForm(forms.Form):
    renewal_date = forms.DateField(help_text="Enter a date between now and 4 weeks (default 3).")

    def clean_renewal_date(self):
        data = self.cleaned_data['renewal_date']
        # Check if a date is not in the past.
        if data < datetime.date.today():
            raise ValidationError(_('Invalid date - renewal in past'))

        # Check if a date is in the allowed range (+4 weeks from today).
        if data > datetime.date.today() + datetime.timedelta(weeks=4):
            raise ValidationError(_('Invalid date - renewal more than 4 weeks ahead'))

        # Remember to always return the cleaned data.
        return data
Django Form from Models
If the form is coupled with database table, it is easy to use ModelForm
Models
-
Sample:
from django.db import models class Movie(models.Model): movie_title = models.CharField(max_length=150) release_year = models.IntegerField() director = models.CharField(max_length=100) movie_poster = models.ImageField(upload_to='images/', None=True) movie_plot = models.TextField() def __str__(self): return self.movie_title # when print movie object it shows title. Also useful #when movie object is showed in dropdown etc -
FieldValidator
-
django.core.validators
-
-
A disabled field
- For read only field set
disabled=True, e.g.mobile = forms.CharField(disabled=True, label='mobile number')
- For read only field set
Create ModelForm class
-
How to create a ModelForm Class #card
-
Code
-
-
Sample
-
The
Metaclass is used to change the behavior of theModelForm. Within it, specify the model your fields come from and the fields you want to use from that model. -
Key components of
Metaclass in ModelForm #card-
model the data model class
-
fields: the fields will be shown in the form
-
widgets: used to generate HTML code that override default behavior. e.g. inputbox with CSS styling
-
-
Explains of Meta class
modelThe Model classfieldsIt is strongly recommended that you explicitly set all fields that should be edited in the form using the fields attribute. Failure to do so can easily lead to security problems when a form unexpectedly allows a user to set certain fields, especially when new fields are added to a model. If those are not your concerns ~fields = "[[all]{.underline}]{.underline}" ~ can easy your jobexcludeSet the exclude attribute of the ModelForm’s inner Meta class to a list of fields to be excluded from the form.
field_classesor formfieldcallback can be used to customize the type of fields instantiated by the form.widgets: override defaultforms.TextInput, It is helpful if you need setupcsse.g.
class PartialAuthorForm(ModelForm): class Meta: model = Author exclude = ['title'] widgets = { "name": forms.widgets.TextInput(attrs={"class": "form-control"}), "password": forms.widgets.PasswordInput(attrs={"class": "form-control"}), "age": forms.widgets.NumberInput(attrs={"class": "form-control"}), "account": forms.widgets.NumberInput(attrs={"class": "form-control"}), "department": forms.widgets.Select(attrs={"class": "form-control"}), }- If you want to apply same attributes for all field, do this
instead by override
__init__
class UserModelForm(forms.ModelForm): def __init__(self, *args, **kwargs): super().__init__(*args, **kwargs) for name, field in self.fields.items(): field.widget.attrs["class"] = style if name == "password": field.required = False # Make the password field optional field.widget = forms.widgets.PasswordInput(attrs={"class": style}) class Meta: model = UserInfo fields = "__all__" # It can be a list of all fields you want to display # password field can also be setup here # password = forms.CharField(required=False, widget=forms.PasswordInput()) # some field need special attention # can also be put here- Error messages
You can reuse the default error messages. In case the message need to be customered for specific field
-
Add New field to ModelForm
-
e.g. Add password confirm input field
class UserModelForm(forms.ModelForm): confirm_password = forms.CharField( label = "please input password again", widget = forms.PasswordInput(render_value=True) ) def __init__(self, *args, **kwargs): super().__init__(*args, **kwargs) for name, field in self.fields.items(): field.widget.attrs["class"] = style if name == "password": field.required = False # Make the password field optional field.widget = forms.widgets.PasswordInput(attrs={"class": style}) class Meta: model = UserInfo fields = "__all__" -
render_valuesallow pre-fill values
-
The html template
<form method="post" enctype="multipart/form-data">
  {% raw %}{% csrf_token %}{% endraw %}
      {{movie_form}}
      <button class="btn btn-primary my-4" type="submit">Submit</button>
</form>
For ((651b71c9-7e23-4638-a89c-240b474388a8)) Add __str__
class Department(models.Model):
    title = models.CharField(verbose_name="Department", max_length=32)
    def __str__(self):
        return self.title
So that when adding user's department in the dropdown, it will show the
title instead of "Python Object"
Create a ModelForm object #card
-
an empyt object (create a new entry)
form = UserModelForm() -
From a POST request (for parse form submit and save data)
form = userModelForm(request.POST) -
From database instance (foir re-edit data)
form = UserModelForm(instance=models.User.objects.filter(id=id).first()) -
From both POST and database (normally when reedit data when form submission failed)
form = UserModelForm(request.POST, instance=models.User.objects.filter(id=id).first())
Save ModelForm(),
-
You can either parse the POST request and get all fields, You can Also do:
Handle form errors
**
Pagination
with python slicing [start:end]
qs = models.Users.objects.all()
qs = models.Users.objects.filter(id=123)[0:10]
qs = models.Users.objects.filter(id=123)[10:20]

qs = models.Users.objects.filter(id=123).order_by('name')[0:20]
qs = models.Users.objects.filter(id=123).order_by('name')[20:40]

page = int(request.GET.get('page', 1))
qs = models.Users.objects.filter(id=123).order_by('name')[(page-1)*page_size:page*page_size]
django template
Pagination generate by python
from django.utils.safestring import mark_safe
...
total = models.Users.objects.filter(id=123).order_by('name').count()
total_pages = totla//page_size + 1
start = cur_page - 5
end = cur_page + 5
for i in range(start, end + 1):
  sel = '""'
  if i == page:
    sel = f'"active"'
  ele = f'<li class={sel} ><a href="?page={i}">{i}</a></li>'
  page_list.append(ele)
page_string=mark_safe(''.join(page_list))
return render(request, 'list.html', {"queryset": qs, "page_list": page_string})
Template
<ul class="pagination">
    <li><a href="{{ head_page }}" aria-label="Previous"><span aria-hidden="true">首页</span></a></li>
    {{ page_string }}
    <li><a href="{{ end_page }}" aria-label="Next"><span aria-hidden="true">尾页</span></a></li>

</ul>
<br>

<form method="get">
    <div style="display:inline-block; width: 150px;">
        <div class="input-group">
            <span> <input type="text" class="form-control" placeholder="请输入页码" name="page"></span>
            <span class="input-group-btn">
                <button class="btn btn-primary" type="submit">跳转</button>
            </span>
        </div>
    </div>
</form>
FBV and CBV
FBV: Function based View
sample
def my_create_view(request, pk):
  template_name = 'form.html'
  form_class = MyForm

  form = form_class

  if request.method == 'POST':
    form = form_class(request.POST)
    if form.is_valid():
      form.save()
      return HttpResponseRedirect(reverse('list-view'))
  elif request.method == 'PUT':
    return ...
  return render(request, template_name, {'form': form})
# url
CBV: Class based view
use as_view() and internally use dispatch()
Pros
-
reuseablity by inherited another view
-
DRY
-
extendability
Cons
-
Implicit code flow
-
decorators require extra override
sample
class MyCreateView(View):
  template_name = 'form.html'
  form_class = MyForm

  def get(self, request, *args, **kwargs):
    form = self.form_class
    return render(request, template_name, {'form': form})

  def post(self, request, *args, **kwargs):
    form = self.form_class(request.POST)
    if form.is_valid():
      form.save()
      return HttpResonseRedirect(reverse('list-view'))
    else:
      return render(request, self.template_name, {'form': form})
# URL
urlpatterns = [
    url(r'^new/$', MyCreateView.as_view(), name='original-create-view')
    url(r'^new_two/$', MyCreateView.as_view(template_name='other_form.html', form_class='MyOtherForm'), name='modified-create-view')
  ]